什么是MEL
MEL(Maya嵌入式语言)是用于操作Maya的脚本语言。
通过使用MEL,您可以自定义用户界面并创建自己的效果。
MEL具有600多个命令和75个功能。
MEL命令的类型
- 场景命令
大约有500种最常用的命令。用于操纵场景及其环境。 - 管理命令
用于文件输入/输出和OS访问。
用户界面命令
用于控制按钮,窗口,菜单等。 - 功能
用于创建运动,粒子位置和其他特殊效果。
有些函数具有数组,曲线,数学函数,随机数和颜色转换等功能。
如何执行MEL命令
-
脚本编辑器(窗口->常规编辑器->脚本编辑器)
在脚本编辑器下的窗口中输入命令,然后通过编辑->执行执行。 -
命令行在
MAYA窗口底部的命令行中 输入命令。 -
加载并执行使用脚本文件编辑器创建的脚本 。
-
.ma文件
-
将脚本存放到工具架并执行。
-
要运行的热键,将脚本分配给热键。
-
当设置或删除Expression 属性时,或者在创建或删除对象时,将执行该命令 。撤消与其他情况不同。
如何获得返回值
什么是返回值
许多MEL命令都有返回值。
有以下方法将返回值分配给变量。
- 使用反引号
string $a;
$a = sphere -r 5- 使用eval
string $com = "shpere";
$a = eval($com + "-r 5")
程序
程序是什么
您可以通过组合多个命令,函数,过程等来定义自己的过程。
该过程具有以下功能。
- 语法是C和Shell脚本的组合。
- 可以使用变量,控制结构等。
- 返回值也可以通过return返回。
- 没有类似C的结构或指针。
程序形式
[global] proc [return type] <程序名称>( [参数, ...] )
{
[MEL]
}
进行程序时的注意事项
- 如果存在同名的过程,则以后定义的过程将有效。
- 您不能创建与函数同名的过程。
脚本
什么是脚本
MEL脚本是一个包含命令和过程的文件。
您可以在脚本中使用global执行定义的过程。
脚本路径设置
默认情况下,在〜/ maya / scripts中搜索MEL脚本。
设置环境变量MAYA_SCRIPT_PATH以从其他目录搜索。
- 例
setenv MAYA_SCRIPT_PATH ~/maya/test:/usr/test
这将在〜/ maya / scripts,〜/ maya / test,/ usr / test中找到脚本。
脚本文件名
可以在Maya中执行MEL脚本,方法是使用文件名(过程名称).mel将其放在脚本路径中。
- 例
如果在脚本中 global proc helloWorld(){ print("Hello World\n"); } 有一个被调用的脚本,则通过保留〜/ maya /在Maya中的MAYA_SCRIPT_PATH中设置的脚本或目录,保留包含该脚本的脚本文件的名称helloWorld.mel。您可以运行helloWorld。
脚本编辑器
通过使用脚本编辑器,可以使用以下功能(窗口->常规编辑器->脚本编辑器)。
- 加载并查看脚本( File -> Open Script )
- 加载脚本,执行命令,定义过程( File -> Source Script )
- 保存脚本 ( File -> Save Selected )
- 执行脚本 ( File -> Execute )
- 查看执行的命令 ( Edit -> Echo All Commands )
- 显示发生错误的行号( Edit -> Show Line Numbers )
- 堆栈跟踪 ( Edit -> Show Stack Trace )
MEL定制
热键
可以通过选项->自定义UI->热键将MEL命令分配给特定的键。
您还可以分配多个命令。
工具架
您也可以将MEL命令添加到工具架中
在脚本编辑器中输入命令。
选中这些命令。
用鼠标中键将突出显示的部分拖放到工具架上,会创建一个默认图标并执行拖拽的命令。
右键进行编辑,使用自己的图标,改变字体大小颜色等
Maya启动设置
启动Maya时,将运行脚本路径中的名为userSetup.mel的脚本。在此脚本中为您自己编写用户界面设置。但是,即使在其中编写了scene命令,也将无济于事,因为所有对象等在启动时都会被清除。
注释和变量
注释
- 有两种类型的注释。
- //
注释直到行尾。(C ++风格) - / /
它不能嵌套。(C语言风格)变量
- //
- 变量名称由字母数字字符和_(下划线)组成。
- 通过$标记变量名称来使用变量。
- 变量具有类型。
- 整型
- 浮点型
- 字符串
- 字符串(类似于C ++ 字符串 )
- 向量
3个浮点数的 数组。(类似于C语言结构)
(示例)<<3, 7.7, 2.5>> - 矩阵
浮点矩阵(类似于二维数组)
(示例)<<2, 1.5, 3.3; 5.5, 2, 1.8>>
2 x 3矩阵
- 数组。
变量声明和初始化的示例
int $tmp = 2;
float $val = 3.5;
string $str = "test";
vector $vec = <<2, 3.2, 5.5>>;
print($vec.y); // 3.2 打印
float $vec_x = $vec.x;
matrix $mat[2][3] = <<1.5, 2, 3.2; -1.5, 3, 4.3>>;
print($mat[0][1]); // 2 打印
float $aval[2] = {3.5, 1.5};
string $strs[2] = {"test", "test2"};
# 对象属性

## 属性名称
对象中有各种属性,您可以通过属性名称访问它们。 使用getAttr命令获取属性的值。

- 例
    ```Mel
    sphere -name Ball;
    float $xval = getAttr Ball.scaleX;
路径
使用使用|(管道)的路径来指示对象所属的组。
- 例
sphere -name Ball;
group -name Group1;
sphere -name Ball;
setAttr Group1|Ball.scaleX 5.5;
setAttr |Ball.scaleX 1.3;
变量类型转换
变量类型转换表
| int | float | string | vector | matrix | |
|---|---|---|---|---|---|
| int | OK | OK | OK | << \$i,\$i,\$i >> | NONE |
| float | 整数部分 | OK | OK | << \$f,\$f,\$f >> | NONE |
| string | 整数部分(如果不是数字,则为0) | OK(如果不是数字,则为0) | 好 | OK(如果不是矢量或浮点,则为0) | NONE |
| vector | 向量长度的整数部分 | 向量长度 | 三个float | OK | 确定(仅[1] [3]) |
| matrix | 向量长度的整数部分(小于[1] [3]时) | 向量长度(小于[1] [3]时) | NONE | 确定(小于[1] [3]时) | 好 |
- 例
int $ival = 2.5; // 1
vector $vec = 3.1; // <<3.1, 3.1, 3.1>>
int $ival2 = "3.2 aaa"; // 3
vector $vec2 = "1.5 2.5 bbb"; // <<1.5, 2.5, 0>>
string $str = <<6, 7, 8>> // "6 7 8"
float $fval = <<3, 4>> // 5
vector $vec3 = <<1, 2>> // <<1, 2, 0>>
自动转换变量
在不同类型之间进行添加时,将自动执行类型转换。
$val = 2 + 3.5; // 5.5
$val = 2 + <<3, 4, 5>>; // <<5, 6, 7>>
$val = "value " + 5 // "value 5"
显式转换
还可以像C语言强制转换一样执行显式类型转换。
$val = (float) 3; // 3.0
$vec = (vector) "<<1, 2, 3>>"; // <<1, 2, 3>>
$str = (string) 56.78; // "56.78"
$val = float(3); // 3.0
$vec = vector( "<<1, 2, 3>>" ); // <<1, 2, 3>>
向量矩阵运算符
非向量运算符
由于int,float和string等运算符与C,C ++等几乎相同,因此省略说明,并在此描述向量矩阵的运算符。
向量运算符
以下运算符可用于向量。
+加--减去*具有int和float的标量积,具有矢量的点积/除%除余^叉积||,&& ,!逻辑运算符==,!=,>,<,> =,<=关系运算符- 也可以使用
+ =,-=,* =,/ =,%=,&=。
例子
vector $v1 = <<1, 2, 3>> + <<4, 5, 6>>; // <<5, 7, 9>>
vector $v2 = <<6, 5, 4>> - <<3, 2, 1>>; // <<3, 3, 3>>
vector $v3 = <<9, 4, 6>> / <<3, 2, 4>>; // <<3, 2, 1.5>>
vector $v4 = <<5, 4, 7>> % <<3, 2, 4>>; // <<2, 0, 3>>
vector $v5 = 3 * <<3, 2, 4>>; // <<9, 6, 12>>
float $val = <<4, 6, 8>> * <<2, 3, 4>>; // 58 ( 点积的结果是浮点数 )
vector $v6 = <<3, 0, 0>> ^ <<0, 4, 0>>; // <<0, 0, 12>>
if(<<1, 2, 3>> && 1); // True
if(<<0, 0, 0>> || 0); // False
if(! <<0, 0, 0>>); // True
if(<<1, 2, 3>> == <<3, 2, 1>>); // False
if(<<1, 2, 3>> == <<1, 2, 3>>); // True
if(<<1, 2, 3>> >= <<3, 2, 1>>); // True
if(<<0, 0, 4>> > <<3, 2, 1>>); // True
矩阵运算符
以下运算符可用于矩阵。
+加--减去*乘法- 另外,也可以使用
+ =,-=,* =。
例子
+并且-必须具有相同数量的行和列。
在*中,左矩阵中的列数和右矩阵中的行数必须匹配。
matrix $mat1[1][4] = <<1, 2, 3, 4>> + <<5, 6, 7, 8>>; // <<6, 8, 10, 12>>
matrix $mat2[1][4] = <<8, 7, 6, 5>> - <<4, 3, 2, 1>>; // <<4, 4, 4, 4>>
matrix $mat3[2][4] = <<1, 2, 3, 4;
                       5, 6, 7, 8>>;
matrix $mat4[4][3] = << 1,  2,  3;
                        4,  5,  6;
                        7,  8,  9;
                        10, 11, 12>>;
matrix $mat5[2][3] = $mat3 * $mat4; // << 70,  80,  90;
                                         158, 184, 210>>
控制结构
控制结构类型
MEL中可以使用的控制结构如下。
与C相同,除了for( in )。
- if()
- switch
- while()
- do while()
- for( ; ; )
- for( in )
例
string $str[3] = { "aaa", "bbb", "ccc" };
for( $val in $str)
{
print($val + "\n");
}
简单的MEL脚本
- 使用文本编辑器,创建一个名为helloWorld.mel的脚本。
global proc helloWorld() { print "Hello World !!"; } - 启动MAYA并使用脚本编辑器按钮或窗口->常规编辑器->脚本编辑器显示脚本编辑器。
- 从脚本编辑器中使用File-> Source Script加载helloWorld.mel。
- 在MAYA下键入命令行 helloWorld(); 。
- 然后在命令行上方的显示区域中会显示
Hello World !!
原始命令
- cone
- cone ( NURBS )
- polyCone
- cube
- nurbsCube ( NURBS )
- polyCube
- curve
- curve ( NURBS )
- circle
- circle ( NURBS )
- cylinder
- cylinder ( NURBS )
- polyCylinder
- plane
- nurbsPlane ( NURBS )
- polyPlane
- polygon
- polyCreateFacet
- sphere
- sphere ( NURBS )
- polySphere
- torus
- torus ( NURBS )
- polyTorus
简单的的MEL脚本
将球体排列成一圈
MEL脚本,将球体排列在$rad一个半径的圆上$num。
global proc circleSphere(float $rad, int $num)
{
    float $x, $z;
    float $r;
    float $add;
    float $rr = 2 * 3.1415;

    $add = $rr / $num;
    for($r = 0.0; $r < $rr; $r += $add)
    {
        $x = $rad * cos($r);
        $z = $rad * sin($r);
        sphere;
        move $x 0.0 $z;
    }
}
运行方法
在这里,让我们将脚本放在目录中,并在执行MAYA时动态加载该脚本。
- 使用circleSphere.mel文件名制作上述脚本。
- circleSphere.mel到 文档/ maya / scripts。
- 从MAYA的命令行输入circleSphere(5, 10)。
- 在半径为5的圆上创建十个球体。
使用此方法,如果在执行circleSphere.mel一次后重写,则更改的部分将不会反映出来,除非您使用脚本编辑器->文件->源脚本重新加载它。
简单的动画
关键帧动画过程
- 使用[currentTime]()设置当前时间。
- 更改对象的属性。
- 使用[setKeyframe]()确定关键帧。
将球体移动一圈
MEL脚本,仅
$rad在 半径为圆的圆上对球$frame进行动画处理。
global proc circleMove(float $rad, int $frame)
{
    float $x, $z;
    float $r;
    float $add;
    float $rr = 2 * 3.1415;

    sphere;
    $add = $rr / $frame;
    for($i = 1, $r = 0.0; $r < $rr; $r += $add, $i ++)
    {
        $x = $rad * cos($r);
        $z = $rad * sin($r);
        currentTime $i;
        move $x 0.0 $z;
        setKeyframe;
    }
}
运行方法
通过从脚本编辑器读取或将其复制到目录来播放球体,从而在播放球体时旋转。
光
灯类型
- 环境光( ambientLight )
- 平行光源 ( directionalLight )
- 聚光灯( SpotLight )
- 点光源 ( pointLight )
- 面光源
代码示例
spotLight; //创建一个聚光灯
setAttr spotLight1.rx -90; //绕x轴旋转-90度
setAttr spotLight1.ty 3; //沿y方向移动3
setAttr spotLight1.coneAngle 30; //将灯光照射角度设置为30度
setAttr spotLight1.penumbraAngle 20; //光线从20度衰减到30度
使用者介面(UI)
用户界面(UI)基础
MEL中的用户界面
在MEL中,您可以创建一个窗口并将命令和程序分配给其中的按钮和菜单。
窗户组件
-
制作Windows UI时,首先要做的是窗口。 由
window命令创建。
可以通过将-visible选项设置为true或使用showWindow来显示它。 -
控制
按钮, 复选框, 单选按钮,图标,字段,滑块等。 -
布局
确定UI元素(按钮等)的排列方式(布局)。 -
组
UI元素(按钮等)组合在一起。 -
菜单
弹出菜单。 -
用于创建“ 收藏夹”切换按钮。
简单的例子
显示一个空白窗口。
window -visible true -title "window1" TestWindow1;显示带有按钮的窗口。
window -wh 200 100 -title "window2" TestWindow2;
columnLayout;
button;
showWindow;
控制项
控件使您可以使用按钮,滚动条,菜单,文本字段等。
控件列表
- 小部件
按钮,复选框,单选按钮,标签,列表等。- button
- checkBox
- iconTextButton
- iconTextCheckBox
- iconTextRadioButton
- radioButton
- separator
- shelfButton
- symbolButton
- symbolCheckBox
- text
- textScrollList
- toolButton
- 滑杆
- floatSlider
- floatSliderGrp
- floatScrollBar
- intSlider
- intSliderGrp
- intScrollBar
- 字段
用户可以在其中键入字符的字段,有些可以执行MEL命令,例如shellField。- floatField
- intField
- nameField
- scrollField
- shellField
- textField
- Menu
- menu
- menuItem
- optionMenu
- popupMenu
例子
window -menuBar true;
columnLayout -adjustableColumn true;
    menu -label "Menu";
        menuItem -label "MenuItem 1";
        menuItem -label "MenuItem 2";
        menuItem -label "MenuItem 3";

    text -label "Text";

    button -label "button";

    text -label "symbolButton";
    symbolButton -w 50 -h 250 -image "C:/Users/Administrators/Desktop/ICON.jpg";

    checkBox -label "CheckBox 1";
    checkBox -label "CheckBox 2";
    checkBox -label "CheckBox 3";

    separator;

    radioCollection;
        radioButton -label "RadioButton 1" -select;
        radioButton -label "RadioButton 2";
        radioButton -label "RadioButton 3";

    text -label "intScrollBar";
    intScrollBar;

    text -label "intSlider";
    intSlider;

    text -label "textScrollList";
    textScrollList -numberOfRows 3 -allowMultiSelection true
        -append "textScrollList 1"
        -append "textScrollList 2"
        -append "textScrollList 3"
        -selectItem "textScrollList 1";

    text -label "textField";
    textField -width 50 -height 30;

    optionMenu -label "OptionMenu";
        menuItem -label "OptionMenu 1";
        menuItem -label "OptionMenu 2";
        menuItem -label "OptionMenu 3";

    text -label "PopupMenu";
        popupMenu ;
            menuItem -label "PopupMenu 1";
            menuItem -label "PopupMenu 2";
            menuItem -label "PopupMenu 3";
showWindow;
布局
什么是布局
它决定如何布置窗户部件。
布局可以嵌套。(您可以在一种布局中使用另一种布局)
布局清单
- columnLayout
零件垂直排列。 - formLayout
部件可以在绝对位置和相对位置自由排列。 - frameLayout显示
带有框架的 子零件。 - gridLayout
零件垂直和水平排列。 - menuBarLayout显示带有
菜单栏的 菜单。 - paneLayout
分割窗口以显示零件。 - rowColumnLayout
零件垂直和水平排列。
每行/列的宽度也可以更改。 - rowLayout
零件并排布置。 - scrollLayout
用滚动条显示零件。
rackLayout制作一个
架子。 - rackTabLayout
创建/编辑文件架/标签组。 - tabLayout创建一个
选项卡。多种布局
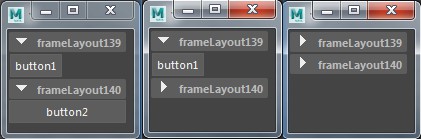
多种布局允许重新放置和折叠小部件。然后setParent使用指定向下扩展到一个布局范围。
比较下面两个示例之间的差异。 - 如果设置setParent
window;
columnLayout;
    frameLayout -collapsable true;
        columnLayout;
            button -label "button1";
        setParent ..;
    setParent ..;
    frameLayout -collapsable true;
        button -label "button2";
    setParent ..;
showWindow;
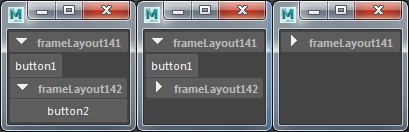
- 如果不设置setParent
window;
columnLayout;
    frameLayout -collapsable true;
        columnLayout;
            button -label "button1";
            frameLayout -collapsable true;
                button -label "button2";
showWindow;
示例
-
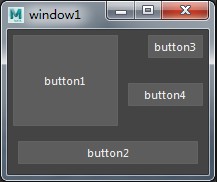
formLayout示例
window; string $form =formLayout -numberOfDivisions 100; string $b1 =button -label "button1"; string $b2 =button -label "button2"; string $b3 =button -label "button3"; string $b4 =button -label "button4"; formLayout -edit -attachForm $b1 "top" 5 -attachForm $b1 "left" 5 -attachControl $b1 "bottom" 15 $b2 -attachPosition $b1 "right" 0 55 -attachNone $b2 "top" -attachForm $b2 "left" 10 -attachForm $b2 "bottom" 10 -attachForm $b2 "right" 10 -attachForm $b3 "top" 5 -attachPosition $b3 "left" 0 70 -attachControl $b3 "bottom" 25 $b4 -attachForm $b3 "right" 5 -attachNone $b4 "top" -attachPosition $b4 "left" 0 60 -attachControl $b4 "bottom" 35 $b2 -attachForm $b4 "right" 5 $form;
showWindow;
## 命令执行
### 执行命令
使用下面描述的选项来定义按下按钮,更改滑块值等时要执行的命令/过程。
### 定义命令的选项
在以下选项之后,将要执行的命令定义为字符串。
但是,并非所有命令都具有这些选项。
- 按下命令按钮等时执行的命令的 定义
- changeCommand
定义值随滑块等变化时的命令。
- onCommand
选中复选框,单选按钮,工具框等时要执行的命令的定义
- offCommand取消
选中复选框,单选按钮,工具框等时要执行的命令的定义
- enterCommand
定义在文本字段等中按Enter键时的命令。
- 通过用dragCommand 滑块等拖动鼠标光标来定义 值更改时的命令。
### 示例
```Mel
int $num;
float $rad;
proc changeSlider()
{
global int $num;
global float $rad;
$num = intSliderGrp -query -value numberSlider;
$rad = floatSliderGrp -query -value radiusSlider;
}
proc makeSphere()
{
global float $rad;
global int $num;
float $x, $z;
float $r;
float $add;
float $rr = 2 * 3.1415;
$add = $rr / $num;
for($r = 0.0; $r < $rr; $r += $add)
{
$x = $rad * cos($r);
$z = $rad * sin($r);
sphere;
move $x 0.0 $z;
}
}
$window = window;
columnLayout;
text -label "Make Sphere Circle";
floatSliderGrp -label "Circle Radius" -field true
-min 0.1 -max 20.0 -step 0.5 -value 1.0
-changeCommand "changeSlider" radiusSlider;
intSliderGrp -label "Number of Spheres" -field true
-min 1 -max 20 -step 1 -value 1
-changeCommand "changeSlider" numberSlider;
rowColumnLayout -numberOfColumns 2;
button -label "Apply" -align "center" -command "makeSphere";
button -label "Cancel" -align "center" -command "deleteUI $window";
setParent ..;
showWindow;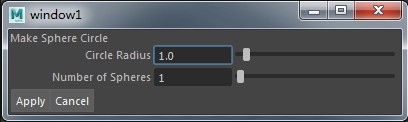
对话
对话类型
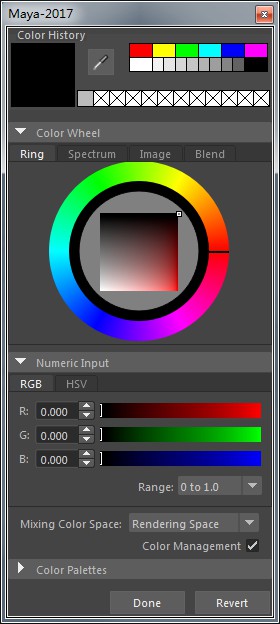
- colorEditor
使用RGB和HSV编辑颜色。
返回颜色值。
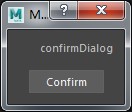
- validateDialog
模态对话框的
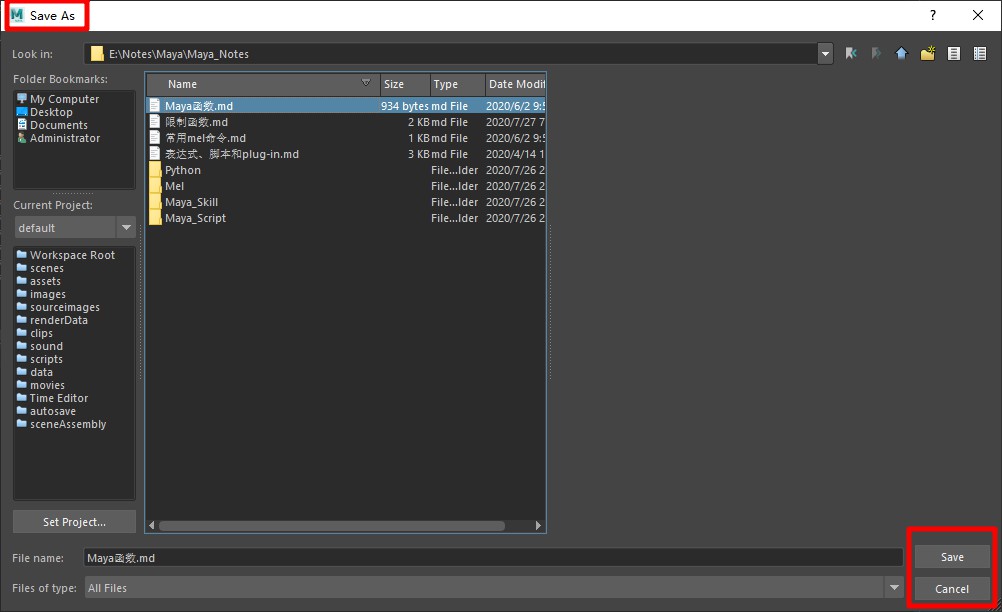
confirmDialog -m "confirmDialog" 执行结果,返回按下按钮的值 。 - fileDialog2 ( fileDialog已弃用 )
用于
选择文件的对话框 返回所选文件名。(标红的都可以更改)
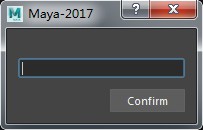
- promptDialog 执行结果
与文本字段模式对话框
promptDialog -m "promptDialog" -text "prompt"
示例
- 如何使用
colorEditor colorEditor将以下四个数字作为一个字符串返回。- 三个0.0到1.0的颜色值(RGB或HSV)
- 1或0,具体取决于是否按下“确定”或“取消”按钮
string $buf[]; string $colstr =colorEditor; tokenize($colstr, $buf); if($buf[3] == "1") { print ("RGB " + $buf[0] + " " + $buf[1] + " " + $buf[2] + "\n"); float $alpha =colorEditor -q -a; print ("Alpha " + $alpha + "\n"); }如果要将颜色值作为浮点数处理,请再次将其分配给float变量或执行以下操作。
colorEditor; // 忽略返回值。 float $cols[] =colorEditor -q -rgb; print ("RGB " + $cols[0] + " " + $cols[1] + " " + $cols[2] + "\n");
- 要在提示对话框中获取文本字段字符串,请稍后使用-query,如下所示。
promptDialog; $ans =promptDialog -query -text;脚本作业
什么是ScriptJob
使用ScriptJob,可以定义在MAYA中事件或状态更改时要执行的命令。
例子
- 返回事件列表。
scriptJob -listEvents; - 返回状态列表。
scriptJob -listConditions; - 删除所选对象。
scriptJob返回作业号。$jobnum = scriptJob conditionTrue "SomethingSelected" "delete";` - 杀死不再需要的工作。 scriptJob -kill $jobnum;
用户界面管理
窗口管理
使用以下命令显示/删除窗口列表。
lsUI
显示UI对象deleteUI
删除UI对象搜索/更改小部件
使用以下标志显示小部件参数的值并在以后更改它们。
- 获取参数标记
-query - 更改参数标记
-edit
示例
- 清单视窗
lsUI -windows; - 删除视窗
deleteUI window1; - 显示按钮标签
button -query -label button1; - 创建窗口后调整大小
window window1;
columnLayout;
showWindow;
window -edit -width 400 -height 300 window1;
button -parent window1 -label "button1" button1;
渲染
渲染执行
要渲染和创建图像文件,请创建相机并使用相机执行渲染。
- 造型
- 灯光设置
- 创建相机(camera)
- 设置渲染参数(renderGlobals,renderQualityNode)
图像文件质量,文件格式等。 - 渲染执行(render)
示例
sphere;
pointLight;
move 10 10 10;
camera -position 0 0 5 -worldCenterOfInterest 0 0 0;
setAttr defaultRenderGlobals.imageFormat 5;     // 5 is SGI image format
render camera1;
属性
节点类型
-
形状节点
定义形状 -
转换节点
定义运动,动画等属性类型
每个节点都有属性。
通过更改此属性执行动画。 -
静态的
节点独有的内容,无法删除 -
动态
可以添加/删除的内容 -
自订
用户定义和添加/删除
如何访问属性如何访问属性
有以下几种通过GUI访问属性的方法。
-
ChannelBox显示
关键帧属性 -
AttributeEditor
编辑器显示所有属性
使用以下命令显示/获取/设置/连接/定义节点的属性。
- listAttr
显示属性 - getAttr
获取属性 - setAttr
设置属性 - connectAttr
连接属性 - disconnectAttr
断开属性连接 - aliasAttr
定义属性别名 - addAttr
添加属性 - deleteAttr
删除属性示例
- 显示关键帧属性
listAttr -k nurbsSphere1; - 获取属性
getAttr nurbsSphere1.ty; - 设定属性
setAttr nurbsSphere1.ty 2.0; - 将nurbsSphere1的sy连接到nurbsSphere2的sy
connectAttr nurbsSphere1.sy nurbsSphere2.sy; - 强制将nurbsSphere1的sy连接到nurbsSphere2的sy(原来连接到nurbsSphere2的sy的属性将断开连接)
connectAttr -f nurbsSphere1.sy nurbsSphere2.sy; - 断开nurbsSphere1的sy和nurbsSphere2的sy的连接
disconnectAttr nurbsSphere1.sy nurbsSphere2.sy; - 名称为up的nurbsSphere1 ty的别名定义
aliasAttr up nurbsSphere1.ty; - 取消nurbsSphere1的别名定义
aliasAttr -remove nurbsSphere1.ty;
aliasAttr -remove nurbsSphere1.up; - 向nurbsSphere1添加了属性
addAttr -longName "otherAngle" -shortName "oa" -min 0.001 -max 90 nurbsSphere1;
太酷啦
小姐姐,问一下,滑动杆,怎么同时选中多个
slider吗